Wednesday, June 19, 2013

How to: Plan a Budget Wedding

It's amazing to me how much weddings cost. The average wedding where I live costs ~$20,000 for about ~$150 guests, according to Cost of Wedding. It's a special day, so it makes sense to fuss over the details, and make everything beautiful.
At the same time, how many young couples have a discretionary $20,000 to spend on a perfect wedding? We don't, and if we did, I'd rather spend it on building a wonderful new life together than on a perfect wedding (that's the point of getting married anyway, right?).
Our budget for the entire event, including wedding bands and the marriage license, is $1,000. Our goal is to keep the cost for the event itself close to $500. Here's how we are doing it:

Reduce

We sat down together and decided what is most important to us for the wedding and reception. We said goodbye to expensive options, such as serving dinner or hors d'oeuvre or renting a nice, outdoor venue, opting instead to host a simple cake reception after the ceremony in his grandma's backyard. Fresh flowers looked a bit pricey, so we've left them out of our budgets, and I'm finding many other beautiful options, such as these paper flowers!

Reuse

We decided to design our wedding theme around items that we already have or can borrow from family members. My mom and I have a spectacular collection of mismatched teacups, so I'm planning to use these for table decorations.
I found these lovely items in my parents' storage unit, including little bags of birdseed leftover from their wedding!
We're also doing a lot of shopping at garage sales, estate sales, and thrift shops so we can reuse other people's things as well. We even found my wedding dress, made in the 1920s, at an estate sale for $30!

Recycle

We're avoiding buying brand new things as much as we can, and instead, focusing on upcycling items from our families, thrift shops, and garage sales. It's incredible what you can do with a bit of paint and glue!
I should note that sometimes even buying supplies for DIY projects can be expensive, so we've done our best to use what we already have or to buy supplies while they are on sale.
Stay tuned for details on my upcoming DIY projects, including decorative chalkboards and my brooch bridal bouquet!
Sneak peek! Some of the supplies for my upcoming projects!
More tips on wedding budgeting to come! Post-wedding, I'll be writing about our expenses to give you a fuller picture of how we pulled it off (because we will!).

Leave your money-saving ideas in the comments!

Sunday, June 9, 2013

Pallet Garden


A pallet garden is a great activity to do to add some color and interest to your backyard. It is small and contained, so it could also be placed on a balcony if you live in an apartment. It should be made towards the beginning of the summer so the plants have plenty of time to mature. Plus, if you make it now, it'll look fantastic by the time the Fourth of July rolls around!

To get a pallet, you can check your local craigslist under the free section, or you can start driving around behind different stores to look for pallets that are just lying around. But if they are organized, I would assume they're not free.

This project will take you at least 2 days. I spent one day making the pallet plantable (about an hour). The next day I bought plants, put dirt in the pallet, and planted everything, which took a bit more time.


You can find landscape fabric for pretty cheap at Lowes. I've used it for several different projects, and still have more left over. Also, if your pallet's wood is harder than mine, you may need to use a hammer and nails rather than staples.


A great resource for growing plants is You Grow Girl.


I was shopping on a budget, so I stopped after I had found about $25 worth of flowers. Two of them are vining, so I am sure it will fill up by mid-summer. But feel free to fill your garden up even more than I did! You can even make it more your own by painting it (only paint the outside though!), adding your favorite flowers, or by making multiple pallet gardens to place next to each other or around your yard. 

Here's the blog that inspired me to make my own pallet garden:
If you have any questions about any of the steps, or have ideas for how to change it, post a comment below! 

Wednesday, June 5, 2013

Little Red and her Wolfe

I'm getting married!
Photo credit: Treasures of Light
Mr. Wolfe popped the question on Christmas Day - five months ago. We're getting married in a little more than three months. Time flies. ♥

For Christmas, I made my dear a wolf hat and began work on a warm red hooded cowl for myself - the idea being, of course, that the two of us would have fairy-tale themed winter wear.
And in our fairy tale, Little Red becomes a wolf.

It's a little sad to say.... I just finished my red hood - too late to wear this winter, but not too late for you to start on one of these projects and finish it easily in time to keep cozy in the colder months! (If you are like me, you'll need to start now; if you stay focused on one project until you finish it, these should take you the equivalent of a few movies).

Wolf

I modified Faye Newport's Future of Forestry Hat to make the wolf hat. It's a simple square-shaped knit hat.
The pattern uses four double-pointed needles; I used a circular needle (because that's what I had for US 10 needles). Because Mr. Wolfe has rather a large head (because he is a man and because he just does), I made the hat slightly larger than the pattern (cast on 80 stitches). Then, in Row 3 of the pattern, I knit 7, purl 1 around. To give it a fuzzy, matted-fur look, I used Yarn Bee Boucle Traditions Brushed in Salt & Pepper.
I think it turned out well, and he wears it all the time. Isn't he handsome?
Photo credit: Treasures of Light

Little Red

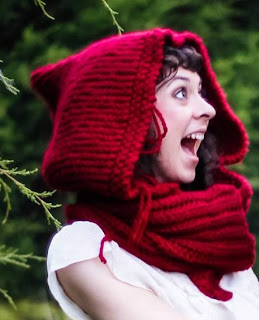
For my red riding hood, I modified and combined the Petite Purls pattern, Capuchon, and Donna Rutledge-Okoro's Oruaka Cowl to make a cowl with a "riding" hood.
I used Premier Yarns Serenity
Chunky in Red Ochre.
I made only the hood for the Capuchon cape. The pattern calls for a 10 ply yarn and size 10.5 circular needle, but since it makes a child's size, I used a 12 ply yarn and size 11 (8.00 mm) needle to ensure a larger finished size. Since I didn't make the cape, I simply cast on 46 stitches before working the set up row as described. I also knit the hood in a garter stitch instead of stockinette.
If I had a do-over, I would have also doubled the width of the seed stitch border because I love the puffy checkerboard pattern it creates!
finished hood
Then I made the Oruaka Cowl. Again, the yarn is a bit bulkier than the pattern calls for, and I used a size N (9.00mm) hook instead of the J (6.00 mm), so I had to adjust a little bit. I used the N because it's the closest size hook I have to the 8.00 mm needle I used to make the hood; I won't buy anything new if something old will do the trick.
I used a slip stitch to attach the hood to the cowl before fastening off. Sadly, I haven't added buttons yet, but as soon as I find exactly the buttons I want, I will let you all know!
I love the bright warmth of my new hood (can't wait until winter to wear it)! ♥
He scared me.
Photo credit: Treasures of Light
Hope you have a fantastic week, all!

♥ Heather

Sunday, June 2, 2013

Welcome!

Heather & Jessica

Oftentimes, the making of something is incidental - unplanned - like the music of a wind chime. Inspiration and the creative impulse breeze through our minds, and we make things. The two of us are driven by different visions and skills; together, we are Jack (as in "of all trades").

We are so excited to begin sharing the results of our creative impulses with you. This is a blog that celebrates the making of things: food, decor, hats, plates, books, pretties, and anything else that we can make.

It is our dream to someday open an Etsy shop to share our creations with everyone, and we hope to feature guest posts from the beautiful and creative people in our lives. We're looking forward to seeing where this new adventures will take us!

So, welcome! And come back soon!
Incidentally,
Jack
(Heather & Jessica)