Thursday, October 3, 2013

There's no place like home.

We're back from Ireland! Actually, we've been back for almost a week and a half. So much to catch up on! That's us in front of Waterford Castle. That beautiful landscape is visible from a point near Dingle. I feel so lucky to have visited such rich and gorgeous places with my handsome man.
Thanks to all our lovely helpers (like Jessica!) and to everyone who came, our wedding was beautiful and incredibly, incredibly special. Seriously. Thank you so much, everyone.
In the coming weeks, I'll be posting about the wedding - one project at a time.

Here's a little sneak peek to give you a taste. Come back for more soon!

Sunday, September 8, 2013

Mr. & Mrs. Wolfe

It happened! They got married! And now they are off to Europe for a beautiful honeymoon. I thought I'd share a few photos that I took from the big event in the meantime. When they get back, Heather is sure to write a few tutorials on how she did many of the things at the wedding, along with the professional photos! Enjoy!


Wednesday, August 14, 2013

Homemade Vanilla

I found a recipe to make homemade vanilla, and thought it would be really cool to try it! I ended up searching a bunch of vanilla recipes, and basically used the average of what those recipes were telling me. 


Ingredients

3 Vanilla Beans
1 cup (cheap) Vodka
1 Jar
4 oz. Jars if desired


You can use any ratio of 3:1, beans to cups of vodka. I had 7 beans, so I used 2.5 cups of vodka.

First, cut the vanilla beans in half. I did this with a knife, and slid it down the bean.


As you can see, there are tiny seeds inside the beans. The beans are rather sticky when you do this, so pull apart the sides a bit so you can see the seeds. Be careful though! The seeds will stick to your hands if you let them!
You will then pour the vodka into the jar, and place the cut beans inside. Close the lid, and shake the jar. The seeds inside the beans will be jostled out of the bean, and slowly settle at the bottom of the jar. 


The following week, you should shake the jar once a day, jostling more seeds out of the bean. After the first week, shake it whenever you think to. One source said to shake it once a week just to remind yourself that it exists! 


The vanilla should stew for around 8-10 weeks. Eight seems to be the average amount, while you can always have it stew longer for a stronger flavor.


You can definitely use the vanilla straight out of the jar, and let the vanilla brew longer, leaving the vanilla beans in the jar. But I transferred the vanilla into individual 4 oz. jars. And, of course, as a graphic design major, I had to design some labels for the bottles.

See how it makes a "V"? :)

I cut shorter sticks of the beans to place inside the jars so as to get a stronger flavor.


These would make great gifts - either for a swap, or a Christmas exchange! Just like they always say, it's never too early to start making vanilla!


Wednesday, July 31, 2013

What inspires you?


There is nothing I love more than being inspired. It happens rarely most days. Then it appears as a beautiful photograph, an amazing idea, or beautiful design. I've decided to share with you some photographs that I've taken that inspire me the most.

The beauty of nature...


Architectural design.

Architecture reflected.

Others' successes.

When savings amount to more than money spent.

And an angry lemur just for fun :D

Tell or show us what inspires you!


Wednesday, July 10, 2013

Incidental Art


One of the things we are trying to show in this blog is how one can make great things by coming about them incidentally. You sort of stumble across something that looks great or is useful. One definition of "incidental" is: liable to happen as a consequence of (an activity). You have to be doing something first in order for something incidental to happen.

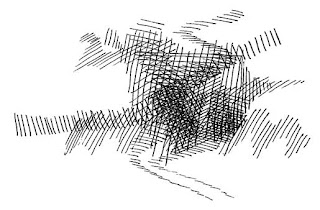
So, one day, I was sketching without any thought of what an end result might be - I just went where my pen took me. I started making lines cross over themselves, creating new shapes within the first layer of lines.


I created more shapes this way, with more of a plan this time.


Soon I got the idea to show the insides of something as if you could see straight through the first layer of something, as you can with these hash lines. I tried this with a whale. I first found a picture from Google that shows some of the insides of a whale, then sketched the outlines in pencil. Finally, I filled in those shapes with hash lines in pen, going opposite directions whenever something was up against another thing.


I soon realized I could create an entire collection of sea creatures with this method! I only have 3 in my collection now, but I would like to continue this collection, and perhaps even make more collections, such as insects, birds, endangered animals etc.

I did not write this post so that you could copy my drawings, but to inspire you to draw something all your own. All you have to do is pick up some paper and a pencil or pen, and start scribbling, doodling, dotting, whatever your hand feels like doing. You will soon invent a new doodle, a new way to draw something, or something entirely different. But you won't know unless you take that first step!

Send us your doodles, and we may feature them in a blog post!


Thursday, July 4, 2013

Fourth of July Treats

Summertime is a time for fun and relaxation, celebration, and the Fourth of July! The thing is… eating heavy, sugary sweets in the heat while celebrating independence is just uncomfortable. Featuring summery fruits in your desserts is a lovely way to lighten up the dish! We made patriotic cupcakes with raspberries and blackberries!

Red, White, & Blue Cupcakes


Ingredients (cupcakes)

1 box vanilla cake mix
1 cup buttermilk (this is instead of the water called for on cake mix box)
Vegetable oil (amount called for on cake mix box)
4 eggs
Raspberries
Blackberries
Liners for cupcake tins (we used festive blue ones!)

Preheat the oven to 350F.
Cut the raspberries into halves and the blackberries into quarters.
Place liners in baking pan.
Mix the cake mix, buttermilk, vegetable oil, and eggs in a mixing bowl. Beat at high speed for 2 minutes. (You can use an electric mixer; we used a whisk and our muscles).
Fill each liner 1/3 of the way full. Drop two of the raspberry halves and two of the blackberry quarters into each cupcake.

Cover with batter until each liner is about 2/3 full.

Bake for 15 – 20 minutes, until tops are springy and toothpick inserted in center comes out clean.
Cool and make topping.

Ingredients (topping)

2 cups of raspberries or blackberries
1/2 cup water
1/4 cup sugar
and a can of ReddiWhip

We followed Emeril’s recipe for raspberry filling for cake – to a point. Here’s what we did:
Place fruit, water, and sugar in saucepan.

Bring to a boil. Reduce heat to simmer. Simmer until the fruit breaks down (for us, this was about 7 minutes).

If you simmer for too long, it will thicken too much. Press mixture through a mesh sieve. Spoon topping on cupcakes, over ReddiWhip as desired.

Enjoy!

Wednesday, June 19, 2013

How to: Plan a Budget Wedding

It's amazing to me how much weddings cost. The average wedding where I live costs ~$20,000 for about ~$150 guests, according to Cost of Wedding. It's a special day, so it makes sense to fuss over the details, and make everything beautiful.
At the same time, how many young couples have a discretionary $20,000 to spend on a perfect wedding? We don't, and if we did, I'd rather spend it on building a wonderful new life together than on a perfect wedding (that's the point of getting married anyway, right?).
Our budget for the entire event, including wedding bands and the marriage license, is $1,000. Our goal is to keep the cost for the event itself close to $500. Here's how we are doing it:

Reduce

We sat down together and decided what is most important to us for the wedding and reception. We said goodbye to expensive options, such as serving dinner or hors d'oeuvre or renting a nice, outdoor venue, opting instead to host a simple cake reception after the ceremony in his grandma's backyard. Fresh flowers looked a bit pricey, so we've left them out of our budgets, and I'm finding many other beautiful options, such as these paper flowers!

Reuse

We decided to design our wedding theme around items that we already have or can borrow from family members. My mom and I have a spectacular collection of mismatched teacups, so I'm planning to use these for table decorations.
I found these lovely items in my parents' storage unit, including little bags of birdseed leftover from their wedding!
We're also doing a lot of shopping at garage sales, estate sales, and thrift shops so we can reuse other people's things as well. We even found my wedding dress, made in the 1920s, at an estate sale for $30!

Recycle

We're avoiding buying brand new things as much as we can, and instead, focusing on upcycling items from our families, thrift shops, and garage sales. It's incredible what you can do with a bit of paint and glue!
I should note that sometimes even buying supplies for DIY projects can be expensive, so we've done our best to use what we already have or to buy supplies while they are on sale.
Stay tuned for details on my upcoming DIY projects, including decorative chalkboards and my brooch bridal bouquet!
Sneak peek! Some of the supplies for my upcoming projects!
More tips on wedding budgeting to come! Post-wedding, I'll be writing about our expenses to give you a fuller picture of how we pulled it off (because we will!).

Leave your money-saving ideas in the comments!

Sunday, June 9, 2013

Pallet Garden


A pallet garden is a great activity to do to add some color and interest to your backyard. It is small and contained, so it could also be placed on a balcony if you live in an apartment. It should be made towards the beginning of the summer so the plants have plenty of time to mature. Plus, if you make it now, it'll look fantastic by the time the Fourth of July rolls around!

To get a pallet, you can check your local craigslist under the free section, or you can start driving around behind different stores to look for pallets that are just lying around. But if they are organized, I would assume they're not free.

This project will take you at least 2 days. I spent one day making the pallet plantable (about an hour). The next day I bought plants, put dirt in the pallet, and planted everything, which took a bit more time.


You can find landscape fabric for pretty cheap at Lowes. I've used it for several different projects, and still have more left over. Also, if your pallet's wood is harder than mine, you may need to use a hammer and nails rather than staples.


A great resource for growing plants is You Grow Girl.


I was shopping on a budget, so I stopped after I had found about $25 worth of flowers. Two of them are vining, so I am sure it will fill up by mid-summer. But feel free to fill your garden up even more than I did! You can even make it more your own by painting it (only paint the outside though!), adding your favorite flowers, or by making multiple pallet gardens to place next to each other or around your yard. 

Here's the blog that inspired me to make my own pallet garden:
If you have any questions about any of the steps, or have ideas for how to change it, post a comment below! 

Wednesday, June 5, 2013

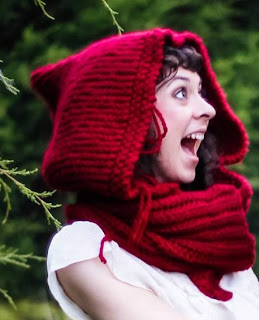
Little Red and her Wolfe

I'm getting married!
Photo credit: Treasures of Light
Mr. Wolfe popped the question on Christmas Day - five months ago. We're getting married in a little more than three months. Time flies. ♥

For Christmas, I made my dear a wolf hat and began work on a warm red hooded cowl for myself - the idea being, of course, that the two of us would have fairy-tale themed winter wear.
And in our fairy tale, Little Red becomes a wolf.

It's a little sad to say.... I just finished my red hood - too late to wear this winter, but not too late for you to start on one of these projects and finish it easily in time to keep cozy in the colder months! (If you are like me, you'll need to start now; if you stay focused on one project until you finish it, these should take you the equivalent of a few movies).

Wolf

I modified Faye Newport's Future of Forestry Hat to make the wolf hat. It's a simple square-shaped knit hat.
The pattern uses four double-pointed needles; I used a circular needle (because that's what I had for US 10 needles). Because Mr. Wolfe has rather a large head (because he is a man and because he just does), I made the hat slightly larger than the pattern (cast on 80 stitches). Then, in Row 3 of the pattern, I knit 7, purl 1 around. To give it a fuzzy, matted-fur look, I used Yarn Bee Boucle Traditions Brushed in Salt & Pepper.
I think it turned out well, and he wears it all the time. Isn't he handsome?
Photo credit: Treasures of Light

Little Red

For my red riding hood, I modified and combined the Petite Purls pattern, Capuchon, and Donna Rutledge-Okoro's Oruaka Cowl to make a cowl with a "riding" hood.
I used Premier Yarns Serenity
Chunky in Red Ochre.
I made only the hood for the Capuchon cape. The pattern calls for a 10 ply yarn and size 10.5 circular needle, but since it makes a child's size, I used a 12 ply yarn and size 11 (8.00 mm) needle to ensure a larger finished size. Since I didn't make the cape, I simply cast on 46 stitches before working the set up row as described. I also knit the hood in a garter stitch instead of stockinette.
If I had a do-over, I would have also doubled the width of the seed stitch border because I love the puffy checkerboard pattern it creates!
finished hood
Then I made the Oruaka Cowl. Again, the yarn is a bit bulkier than the pattern calls for, and I used a size N (9.00mm) hook instead of the J (6.00 mm), so I had to adjust a little bit. I used the N because it's the closest size hook I have to the 8.00 mm needle I used to make the hood; I won't buy anything new if something old will do the trick.
I used a slip stitch to attach the hood to the cowl before fastening off. Sadly, I haven't added buttons yet, but as soon as I find exactly the buttons I want, I will let you all know!
I love the bright warmth of my new hood (can't wait until winter to wear it)! ♥
He scared me.
Photo credit: Treasures of Light
Hope you have a fantastic week, all!

♥ Heather